Getting ready to start or continue working on your garden? Consider starting your seeds indoors. There are many reasons to start your garden seeds indoors: getting a jump on the growing season, protecting your seedlings from critters, growing more varieties, etc. No matter what your reason, here are some tips to help you get started.
How to get started:
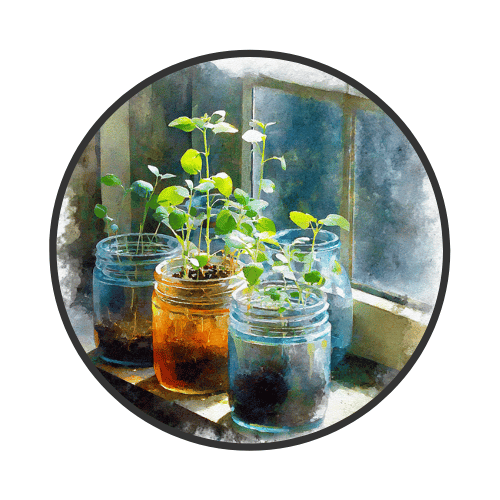
Starting seed indoors does require time, space and the right tools. Many local garden shops will have a seed starting kit and that is perfectly fine to use. Most come with little plastic “pots” where you will put your soil and seeds while they grow indoors. Some have biodegradable pots that you can plant directly into the ground without having to remove the plant. Another way to reduce and reuse is to use a cardboard egg carton. These are the perfect size for starting seeds and can be planted directly into the ground where they will decompose and provide nutrients to your little plants. Lastly, don’t forget labels! A lot of seedling plants look alike as babies, so be sure to correctly label your seedlings.
Setting up:
You will want to start your seeds in a warm location where they can receive a fairly constant temperature. A big swing in temperature change can damage your young plants, consider this if you are putting them close to a large window. You can also use a warming pad to keep the soil temperature constant, just be certain to check it regularly as too much heat will kill your seeds.
The seeds will also need access to either natural sunlight or a light lamp. If you use a light lamp, do not leave it on all the time. Plants need approximately 12 hours of light a day along with a dark period in order to properly grow. Lastly, you will need a tray to catch any overflow of water in case of overwatering. Once you have found a location, try to keep your seeds in that same place as much as possible. Seedlings are sensitive and too much change can shock them.
Planting:
Gently fill your pots with ⅔ full with soil, do not force the soil in, but gently pack it down. The soil should still be somewhat loose so that water can drain out. If the soil is packed too tightly, the water will not be able to drain and your seeds may rot. Following the directions on your seed package, place the appropriate amount of seeds in each pot and cover lightly with additional soil. Water the pots and check to make sure that excess water is draining out. TIP: Using a spray bottle to water your plants can help prevent overwatering, however, be sure that they are getting enough water and the soil does not dry out. Continue to follow the seedling care instructions on your seed packages and you should see seedlings start to appear in a week or two.
Thinning and Hardening:
Once your seedlings are visible, you may need to thin them out. This means, removing the smaller plants to allow the larger ones to continue to grow. The best way to do this is to snip off the smaller seedlings close to the soil so that you do not disturb the roots of the thriving plants.
When you are about 2 weeks away from transplanting your seedlings outside, it is time to start hardening them. Plants grown indoors have not had to deal with the natural elements, so you will want to prepare them by slowly exposing them. If it is too cold to place them outside, you can start by placing a fan near them to gently blow on them. This will cause the stems of your plants to grow stronger so that they are less likely to break. When the outside temperature is warm enough, start placing your seedlings outside for a few hours a day. Start in the shade and gradually move them into the sun, this will acclimate them so that they won’t get scorched when transplanted.
Transplanting:
When your seedlings are ready to be transplanted, remember to be careful of their roots. The roots of many plants are sensitive, so try not to manipulate them too much. This is where the biodegradable pots or egg cartons come in handy as they can just be planted directly into the ground. For these types of pots, carefully tear or snip holes in the bottom to encourage the roots to spread through the garden.
The best time to transplant is on a cloudy day or late in the afternoon when the sun is past its peak. Many plants experience transplant shock and may wilt, most will recover with time and gentle watering. Once your seedlings are in the garden, be sure to water them thoroughly. Set up a regular daily watering schedule as shallow roots are more susceptible to drying out. As your plants grow you can amend your watering schedule.
Good luck with your gardening and may you have a great harvest!!


